Friday, February 14, 2014

Happy Valentine's Day!! This year, Audrey and I wanted to make something for all of her friends and family. We thought, why not make something very close and dear to her heart. Cookies and milk!! Below is our Valentine craft project for you to recreate. Of course, as your favorite stationer, and as a very special Valentine treat, I've posted a free to download DIY printable for the tags. Enjoy!!


8 oz. Mini Milk Jars, complete with lids and vintage paper straws (in color of your choice!) - starting at $26.99 per dozen, with free shipping. http://www.amazon.com/gp/aw/d/B00C1Y8A8C?vs=1

Mini bite size Oreos- found at your local grocery store

Hemp/Raffia Twine- found at Michaels or AC Moore

FREE downloadable tag- JW Impressions (file will be available shortly)

Saturday, March 2, 2013

Grand Opening of JW Impressions on ETSY

Grand Opening of my ETSY Shop

Finally! I've been talking about opening an etsy shop for a little while now, BB and AD. That's before baby and after baby incase you aren't familiar. It's finally opened, HALLELUJAH! I'm starting my etsy shop off with simple DIY (Do it yourself) printables. These are sold for a flat rate design fee. The designs are already complete, but the wording and color selections are up for change. I then will email the buyer (hopefully that's you) a proof of their invite/announcement and once it's approved by them they will receive a high resolution print ready PDF to print anywhere they please, as many times as they please (for personal use only). Simple, easy peasy in my opinion. 

I'm excited to be able to offer these pre designed looks to my followers that are interested in "point and click" purchasing. I understand that not ALL of the world likes the in depth process JW Impressions offers to clients when it comes to stationery needs for their social events. This is a place that takes all of the back and forth out of it, but still gives you my blood, sweat and tears in my designs. Every single design is made with utmost perfection in mind. I hope you all enjoy viewing the items for sale, and have a need for them in the near future. Check it out here!

Here are some of my personal favorites I've listed. 


As always, you have many colors to choose from. If you don't see the color you want... just convo me and I will add it!


Thursday, February 7, 2013

Will You Be Mine? Valentine's Day 2013

Umm, yea, it's me. I'm sure you are all like "who is this girl and why is she blogging"!? Remember, I used to blog monthly about all things paper. Well, I know it's been a while... ok, more then a while. BUT, I have reasons... more like excuses, but good ones at that. Biggest change in my life is that I had a BABY!!! Yup, I did. She is perfect and I love everything about her. Audrey was born on Friday, June 22, 2012. Here's a little lookie at her and her perfectness, lol!


Needless to say, I have been a little behind on my blog. But, I'm BACK! I can't make any promises, but I will try to get back into my groove of posting about all things paper.

My first "better late then never" post is going to be about the super cute Valentine cards and tags I just finished designing. Valentine's Day is just around the corner and because I have my own little adorable, smiley, and lovable Valentine (sleeping upstairs as I speak) this year, I really got into designing some fun and festive Valentine cards for kids. Check 'em out~ and peace out.


Thursday, July 28, 2011

Why do invites have inner envelopes?

First let me start by saying, this is the most commonly asked question by ALL of my Brides and Grooms when it comes to the details of their invitation. Each time I explain why there is a need for an inner envelope, but also keep in mind... it's a new era and people do what they want, not everyone feels it's necessary to have an inner envelope. With that said, I, however, follow the rules of Emily Post Wedding Etiquette, and she says just this:

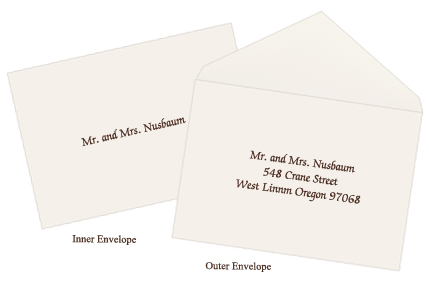
The inner envelope has the title and last names of the Guest(s) receiving the invite and nothing more, no address on this envelope. This also allows the host to specify who is invited and who is NOT invited. It is also ok to write familiar names here like; Nana and PopPop or Uncle James and Aunt Jean. If you are only inviting adults then the inner envelope would look like this:

Mr. and Mrs. Oliver Smith

If you are inviting their children along with the parents, the inner envelope would read:

Mr. and Mrs. Oliver Smith
Jennifer Smith
Brian Smith

The inner envelope is another place for where to write "and Guest". If you are guesting someone with their invite, it's always nice to include the Guests' name if you know it, but if not "Guest" is fine. It is not appropriate to write "and Guest" on the OUTER envelope, which is reserved for addressing purposes, hence the inner envelope.

Last but not least, this allows you another area of your invite to color coordinate with your wedding theme by lining the inner envelope with a color of your choice! You're wedding invite is once in a lifetime... go all out!


Saturday, June 25, 2011

Jamie & Ben - 03.25.11

Jamie and Ben came to me with a mutual love of things black, white and green... and of course damask! This time around I was going for something completely different than my "claim to fame" damask design. We wanted to step outside of the box and we did just that! This was kind of couple that wanted a fun, mod, and colorful design. I couldn't think of any better words that best describe them as a couple either, fun, mod and colorful.

The invite: This was the inspiration of the entire suite and set the tone from the get-go.


The next suite to design was the Day of Suite... all things needed for the day of the wedding. My personal favorite was the program, 3 pages strung together with matching ribbon and delicately hung on every other chair for the ceremony. Love! The Day of Suite consisted of: Welcome Bag Tags, Programs, Table Number Signs, and Jamie and Ben's ultra-fun creation... the escort cards! (Pictures of the programs, table numbers and escort cards were taken by Stevie T Photography)


Here's the happy couple! It was a pleasure working with them and I wish them nothing but the best going forward in their new life together! 

Tuesday, June 21, 2011

Belly Bands

Belly bands are used to enclose all of your invitation contents within the envelope. It's a decorative strip of paper, most of the time with your monogram or names printed on the front, bound around the invite and accessory cards by a little glue dot or strip of double sided adhesive in the back. Not only does it look beautiful, but it also doubles as a simple way to keep all of those little cards safe, sound and together inside. See below.... love it, right!?!


Wednesday, June 8, 2011

Envelope Garnish!

You've spent the time perfecting the invite, the respond card, the accommodations card, etc... now that the inside contents are taken care of, don't forget about the last piece to your ensemble... the envelope! The outside of the envelope is the very FIRST thing your guests will see as a part of your special event. Don't just slap an Avery laser-jet label with your return address printed slightly crooked onto your masterpiece! Take the extra step to wrap up your invite with a pretty little bow.

Below are some ideas of how to add that extra garnish to your invite, super cute huh!?

Return Address Printing: Coordinating fonts and inks stay with the theme of your invite and looks effortless. My personal favorite is to add a motif or monogram on the flap.
Envelope Icing: Truly the icing on the proverbial cake! This new twist on an address label also doubles as a guest address label for the front. Either have these addressed by a calligrapher or pre-printed digitally during the production process of the label itself.
The last idea is the most common but still adorable. Envelope seals: This literally seals your envelope with an adhesive label. Have a monogram or a cute quote printed on it and tada! Your envelope is officially garnished.